这可以通过两种方式实现:

方法1:使用WMI

RDS侦听器的配置数据存储在WMI中Root\CimV2\TerminalServices命名空间下的Win32_TSGeneralSetting类中。
RDS侦听器的证书通过该证书的Thumbprint值在名为SSLCertificateSHA1Hash的属性上进行引用。
此指纹值对于每个证书都是唯一的。您可以使用以下步骤找到值:

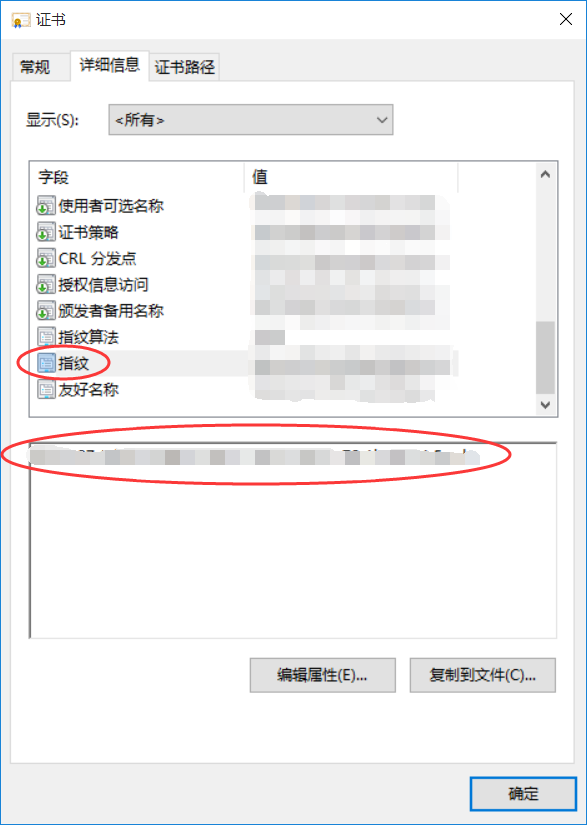
  • 打开证书的属性对话框,然后选择“详细信息”选项卡。
  • 向下滚动到“指纹”字段,这是证书属性中的证书指纹的外观:
    cer.jpg
    注意:要使用的证书,必须在运行上述命令之前导入到计算机帐户的“个人”证书存储中。否则将导致“无效参数”错误。
  • 复制证书里的指纹,管理员运行cmd,输入如下代码:
wmic /namespace:\\root\cimv2\TerminalServices PATH Win32_TSGeneralSetting Set SSLCertificateSHA1Hash="<刚才获得的Hash>" 
  • 最后重启 TermService 服务, 测试连接即可. 注意连接的 Hostname 必须和证书中的一致。

方法2:编辑注册表

  1. 使用计算机帐户将服务器身份验证证书安装到“个人”证书存储中。
  2. 创建以下包含证书的SHA1哈希值的注册表值,以将该自定义证书配置为支持TLS,而不使用默认的自签名证书。
    HKEY_LOCAL_MACHINE\SYSTEM\CurrentControlSet\Control\Terminal Server\WinStations\RDP-Tcp
    值名称:SSLCertificateSHA1Hash
    值类型:REG_BINARY
    值数据:<certificate thumbprint>
    该值应为证书的指纹,以逗号','分隔,并且不能有空格。
  3. 远程桌面主机服务服务在NETWORK SERVICE帐户下运行。因此,有必要将RDS使用的密钥文件的ACL(由SSLCertificateSHA1Hash注册表值中命名的证书引用)设置为包括具有“读取”权限的NETWORK SERVICE
    要修改权限,请执行以下步骤:

    • 单击开始,单击运行,键入mmc ,然后单击确定
    • 文件菜单上,单击添加/删除管理单元
    • 添加或删除管理单元对话框的可用管理单元列表中,单击证书,然后单击添加
    • 证书管理单元对话框中,单击计算机帐户,然后单击下一步
    • 选择计算机对话框中,单击本地计算机:(运行此控制台的计算机) ,然后单击完成
    • 添加或删除管理单元对话框中,单击确定
    • 证书管理单元的控制台树中,展开证书(本地计算机),再展开个人,然后导航到您要使用的SSL证书。
    • 右键单击证书,选择所有任务,然后选择管理私钥
    • 权限对话框中,单击添加, 键入NETWORK SERVICE,单击确定, 在允许复选框下选择读取,然后单击确定
  4. 最后重启 TermService 服务, 测试连接即可. 注意连接的 Hostname 必须和证书中的一致。

参考链接:
Listener Certificate Configurations in Windows Server 2012/2012 R2
使用SSL证书为Windows(非Server)远程桌面RDP连接加密
简单的给远程桌面连接 (Remote Desktop) 配置自定义 SSL 证书


服务端配置步骤:

1.首先查看一些注意事项项目范围

2.下载最新版本OpenSSH包, 本地下载(Win64版本v8.1.0.0p1-Beta)

3.将最新版本的内容提取到 C:\Program Files\OpenSSH(确保二进制位置仅对SYSTEM,管理员组具有写权限。经过身份验证的用户应该并且仅具有读取和执行。)

4.进入C:\Program Files\OpenSSH然后管理员模式运行Powershell,运行以下命令

 powershell.exe -ExecutionPolicy Bypass -File install-sshd.ps1

5.打开sshd.exe的防火墙,以允许入站SSH连接

New-NetFirewallRule -Name sshd -DisplayName 'OpenSSH Server (sshd)' -Enabled True -Direction Inbound -Protocol TCP -Action Allow -LocalPort 22

备注:New-NetFirewallRule 仅适用于Windows 2012及更高版本的服务器。如果您使用的是客户端台式机(例如Windows 10)或Windows 2008 R2及更低版本,请尝试:

  netsh advfirewall firewall add rule name=sshd dir=in action=allow protocol=TCP localport=22

6.开始 sshd 服务

net start sshd

Set-Service sshd -StartupType Automatic

客户端配置步骤:

1.首先检查是否安装了SSH客户端,打开Windows PowerShell,运行 ssh 查看是否有反馈 (Windows 10 1803后自带ssh客户端,如果没有,可参考安装步骤)

2.需要为客户端生成一些公钥/私钥对,使用 ssh-keygen 生成一些密钥文件

cd ~\.ssh\
ssh-keygen

你可以按 Enter 来接受默认值,或指定要在其中生成密钥的路径 (其中,“username”将替代为你的用户名,”id_ed25519“是代替公钥,”id_ed25519.pub“是代替私钥)

Enter passphrase (empty for no passphrase):
Enter same passphrase again:
Your identification has been saved in C:\Users\username\.ssh\id_ed25519.
Your public key has been saved in C:\Users\username\.ssh\id_ed25519.pub.
The key fingerprint is:
SHA256:OIzc1yE7joL2Bzy8!gS0j8eGK7bYaH1FmF3sDuMeSj8 username@server@LOCAL-HOSTNAME

3.请以管理员身份启动 ssh-agent 服务并使用 ssh-add 来存储私钥

# Make sure you're running as an Administrator
Start-Service ssh-agent

# This should return a status of Running
Get-Service ssh-agent

# Now load your key files into ssh-agent
ssh-add ~\.ssh\id_ed25519

部署公钥步骤:

-(如果用普通用户 连接服务端)

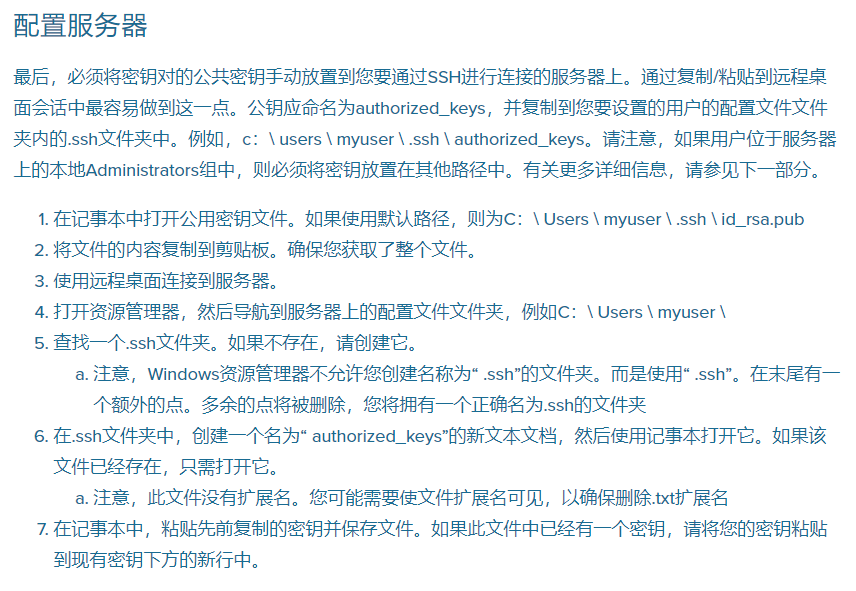
将客户端的公钥 (~.ssh\id_ed25519.pub) 的内容移动到服务端上~\.ssh中名为authorized_keys(无扩展名) 的文本文件中。
在客户端上启动Windows PowerShell,运行以下命令

# Make sure that the .ssh directory exists in your server's home folder
ssh user1@domain1@contoso.com mkdir C:\users\user1\.ssh\

# Use scp to copy the public key file generated previously to authorized_keys on your server
scp C:\Users\username\.ssh\id_ed25519.pub user1@domain1@contoso.com:C:\Users\user1\.ssh\authorized_keys

# Appropriately ACL the authorized_keys file on your server
ssh --% user1@domain1@contoso.com powershell -c $ConfirmPreference = 'None'; Repair-AuthorizedKeyPermission C:\Users\user1\.ssh\authorized_keys

服务端其他操作方法

user_cn.png

-(如果用管理用户 连接服务端)

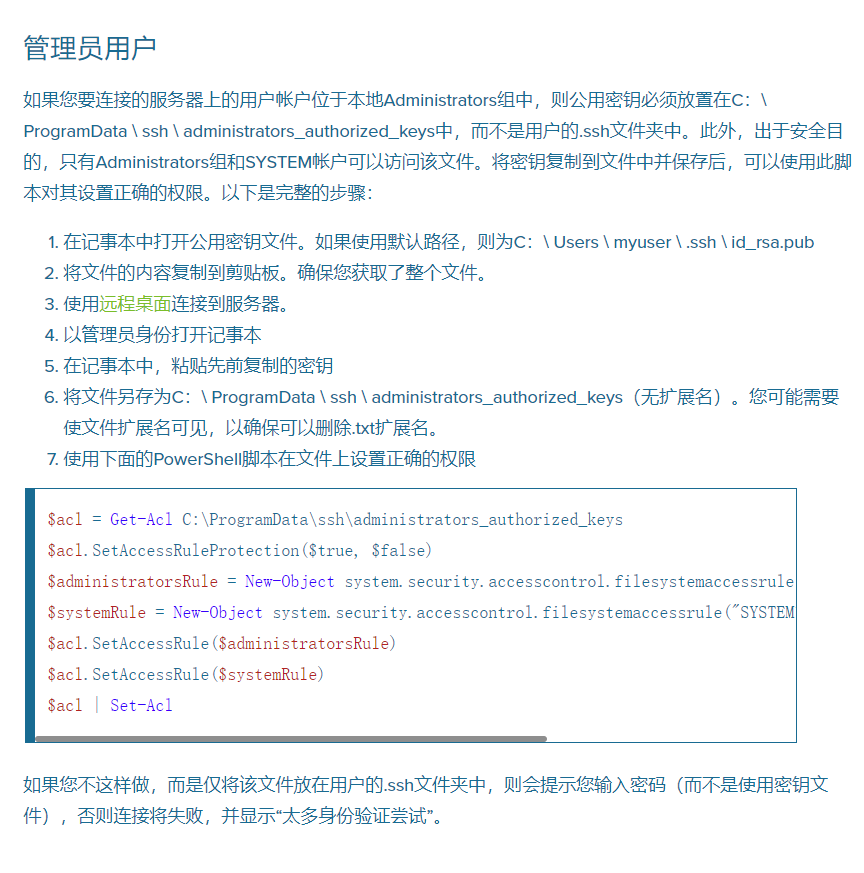
将客户端的公钥 (~.ssh\id_ed25519.pub) 的内容移动到服务端上C:\ProgramData\ssh\中名为administrators_authorized_keys (无扩展名)的文本文件中。

在服务端上启动Windows PowerShell,运行以下命令

$acl = Get-Acl C:\ProgramData\ssh\administrators_authorized_keys
$acl.SetAccessRuleProtection($true, $false)
$administratorsRule = New-Object system.security.accesscontrol.filesystemaccessrule("Administrators","FullControl","Allow")
$systemRule = New-Object system.security.accesscontrol.filesystemaccessrule("SYSTEM","FullControl","Allow")
$acl.SetAccessRule($administratorsRule)
$acl.SetAccessRule($systemRule)
$acl | Set-Acl

服务端其他操作方法

admin_cn.png
参考链接:
适用于 Windows 的 OpenSSH 服务器配置 | Microsoft Docs
Install Win32 OpenSSH
Key-based Authentication for OpenSSH on Windows - Concurrency


客户端配置文件说明:


# [common]是整数部分
[common]
# 必须包含IPv6的文字地址或主机名
# 用方括号括起来,例如“ [:: 1]:80”,“ [ipv6-host]:http”或“ [ipv6-host%zone]:80”
server_addr = 0.0.0.0
server_port = 7000

# 如果您想通过http代理或socks5代理连接frps,则可以在此处或在全局环境变量中设置http_proxy
# 仅在协议为tcp时有效
# http_proxy = http://user:passwd@192.168.1.128:8080
# http_proxy = socks5://user:passwd@192.168.1.128:1080

# 控制台或真实的logFile路径,例如./frpc.log
log_file = ./frpc.log

# trace, debug, info, warn, error
log_level = info

log_max_days = 3

# 在log_file为控制台时禁用日志颜色,默认为false
disable_log_color = false

# 用于身份验证
token = 12345678

# 通过http api设置控制frpc动作的管理地址,例如reload
admin_addr = 127.0.0.1
admin_port = 7400
admin_user = admin
admin_pwd = admin
# 管理资产目录。默认情况下,这些资产与frpc捆绑在一起。
# asset_dir = ./static

# 连接将提前建立,默认值为零
pool_count = 5

# 如果使用tcp流多路复用,默认为true,它必须与frps相同
tcp_mux = true

# 您的代理名称将更改为{user}.{proxy}
user = your_name

# 决定第一次登录失败时是否退出程序,否则连续重新登录到frps
# 默认为true
login_fail_exit = true

# 用于连接服务器的通信协议
# 现在它支持tcp,kcp和websocket,默认为tcp
protocol = TCP

# 如果tls_enable为true,则frpc将通过tls连接frps
tls_enable = true

# 指定一个dns服务器,因此frpc将使用此服务器代替默认服务器
# dns_server = 8.8.8.8

# 您要开始的个代理名称,以“,”分隔
# 默认为空,表示所有代理
# start = ssh,dns

# heartbeat configure,不建议修改默认值
# heartbeat_interval的默认值为10,heartbeat_timeout为90
# heartbeat_interval = 30
# heartbeat_timeout = 90

# 客户端的其他元信息
meta_var1 = 123
meta_var2 = 234

# 'ssh'是唯一的代理名称
# 如果[common]部分中的用户不为空,则它将更改为{user}.{proxy},例如'your_name.ssh'
[ssh]
# tcp | udp | http | https | stcp | xtcp,默认为tcp
type = tcp
local_ip = 127.0.0.1
local_port = 22
# 限制此代理的带宽,单位为KB和MB
bandwidth_limit = 1MB
# true或false,如果为true,则将对frps和frpc之间的消息进行加密,默认为false
use_encryption = false
# 如果为true,邮件将被压缩
use_compression = false
# 远程端口通过frps侦听
remote_port = 6001
# frps将为同一组中的代理负载平衡连接
group = test_group
# 组应该具有相同的组密钥
group_key = 123456
# 启用后端服务的运行状况检查,它现在支持'tcp'和'http'
# frpc将连接本地服务的端口以检测其健康状态
health_check_type = TCP
# 运行状况检查连接超时
health_check_timeout_s = 3
# 如果连续3次失败,则代理将从frps中删除
health_check_max_failed = 3
# 每10秒进行一次健康检查
health_check_interval_s = 10
# 每个代理的其他元信息
meta_var1 = 123
meta_var2 = 234

[ssh_random]
type = tcp
local_ip = 127.0.0.1
local_port = 22
# 如果remote_port为0,则frps将为您分配一个随机端口
remote_port = 0

# 如果要公开多个端口,请在节名称前添加'range:'前缀
# frpc将生成多个代理,例如'tcp_port_6010','tcp_port_6011'等。
[range:tcp_port]
type = tcp
local_ip = 127.0.0.1
local_port = 6010-6020,6022,6024-6028
remote_port = 6010-6020,6022,6024-6028
use_encryption = false
use_compression = false

[DNS]
type = udp
local_ip = 114.114.114.114
local_port = 53
remote_port = 6002
use_encryption = false
use_compression = false

[range:udp_port]
type = udp
local_ip = 127.0.0.1
local_port = 6010-6020
remote_port = 6010-6020
use_encryption = false
use_compression = false

# 将域名解析为[server_addr],以便可以使用 http://web01.yourdomain.com 浏览web01和使用 http://web02.yourdomain.com 浏览web02
[web01]
type = http
local_ip = 127.0.0.1
local_port = 80
use_encryption = false
use_compression = true
# http用户名和密码是http协议的安全认证
# 如果未设置,则无需认证即可访问此custom_domains
http_user = admin
http_pwd = admin
# 如果frps的域是frps.com,则可以通过URL http://test.frps.com 访问[web01]代理
subdomain = web01
custom_domains = web02.yourdomain.com
# 个位置仅适用于http类型
locations = /,/pic
host_header_rewrite = example.com
# 带有前缀“ header_”的参数将用于更新http请求标头
header_X-From-Where = frp
health_check_type = http
# frpc将GET HTTP请求'/ status'发送到本地http服务
# http服务在返回2xx http响应代码时仍处于活动状态
health_check_url = /status
health_check_interval_s = 10
health_check_max_failed = 3
health_check_timeout_s = 3

[web02]
type = https
local_ip = 127.0.0.1
local_port = 8000
use_encryption = false
use_compression = false
subdomain = web01
custom_domains = web02.yourdomain.com
# 如果不为空,则frpc将使用代理协议将连接信息传输到您的本地服务
# v1或v2或为空
proxy_protocol_version = v2

[plugin_unix_domain_socket]
type = tcp
remote_port = 6003
# 如果定义了插件,则local_ip和local_port无效
# 插件将处理从frps获得的连接
plugin = unix_domain_socket
# 插件需要前缀“ plugin_”的参数
plugin_unix_path = /var/run/docker.sock

[plugin_http_proxy]
type = tcp
remote_port = 6004
plugin = http_proxy
plugin_http_user = abc
plugin_http_passwd = abc

[plugin_socks5]
type = tcp
remote_port = 6005
plugin = socks5
plugin_user = abc
plugin_passwd = abc

[plugin_static_file]
type = tcp
remote_port = 6006
plugin = static_file
plugin_local_path = /var/www/blog
plugin_strip_prefix = static
plugin_http_user = abc
plugin_http_passwd = abc

[plugin_https2http]
type = https
custom_domains = test.yourdomain.com
plugin = https2http
plugin_local_addr = 127.0.0.1:80
plugin_crt_path = ./server.crt
plugin_key_path = ./server.key
plugin_host_header_rewrite = 127.0.0.1
plugin_header_X-From-Where = frp

[plugin_http2https]
type = http
custom_domains = test.yourdomain.com
plugin = http2https
plugin_local_addr = 127.0.0.1:443
plugin_host_header_rewrite = 127.0.0.1
plugin_header_X-From-Where = frp

[secret_tcp]
# 如果类型为secret tcp,则remote_port无效
# 谁想连接本地端口,应该使用stcp代理部署另一个frpc,角色是visitor
type = stcp
# sk用于访客身份验证
sk = abcdefg
local_ip = 127.0.0.1
local_port = 22
use_encryption = false
use_compression = false

# frpc的用户在stcp服务器和stcp访问者中应该相同
[secret_tcp_visitor]
# frpc角色访问者-> frps-> frpc角色服务器
role = visitor
type = stcp
# 您要访问的服务器名称
server_name = secret_tcp
sk = abcdefg
# 将此地址连接到访客stcp服务器
bind_addr = 127.0.0.1
bind_port = 9000
use_encryption = false
use_compression = false

[p2p_tcp]
type = xtcp
sk = abcdefg
local_ip = 127.0.0.1
local_port = 22
use_encryption = false
use_compression = false

[p2p_tcp_visitor]
role = visitor
type = xtcp
server_name = p2p_tcp
sk = abcdefg
bind_addr = 127.0.0.1
bind_port = 9001
use_encryption = false
use_compression = false

[tcpmuxhttpconnect]
type = tcpmux
multiplexer = httpconnect
local_ip = 127.0.0.1
local_port = 10701
custom_domains = tunnel1

服务端配置文件说明:


#[common]是整数部分
[common]
#必须包含IPv6的文字地址或主机名
#用方括号括起来,例如“ [:: 1]:80”,“ [ipv6-host]:http”或“ [ipv6-host%zone]:80”
bind_addr = 0.0.0.0
bind_port = 7000

#udp端口有助于使udp孔穿透nat
bind_udp_port = 7001

#用于kcp协议的udp端口,可以与'bind_port'相同
#如果未设置,则以frps禁用kcp
kcp_bind_port = 7000

#指定要侦听的地址代理,默认值与bind_addr相同
#proxy_bind_addr = 127.0.0.1

#如果要支持虚拟主机,则必须设置用于侦听的http端口(可选)
#注意:http端口和https端口可以与bind_port相同
vhost_http_port = 80
vhost_https_port = 443

#vhost http服务器的响应标头超时(秒),默认为60s
#vhost_http_timeout = 60

# TcpMuxHttpConnectPort指定服务器侦听TCP的端口
# HTTP CONNECT请求。 如果值为0,则服务器将不会多路传输TCP
# 在单个端口上的个请求。 如果不是,它将在此值上监听
# HTTP CONNECT请求。 默认情况下,此值为0
# tcpmux_httpconnect_port = 1337

#设置dashboard_addr和dashboard_port以查看frps的仪表板
#dashboard_addr的默认值与bind_addr相同
#只有设置了dashboard_port,仪表板才可用
dashboard_addr = 0.0.0.0
dashboard_port = 7500

#仪表板用户和passwd用于基本身份验证保护,如果未设置,则两个默认值均为admin
dashboard_user = admin
dashboard_pwd = admin

# enable_prometheus将在/metrics api中的{dashboard_addr}:{dashboard_port}上导出prometheus指标。
enable_prometheus = true

#仪表板资产目录(仅适用于调试模式)
#asset_dir = ./static
#控制台或真实的logFile路径,例如./frps.log
log_file = ./frps.log

#跟踪,调试,信息,警告,错误
log_level = info

log_max_days = 3

#在log_file为控制台时禁用日志颜色,默认为false
disable_log_color = false

# DetailedErrorsToClient定义是否将特定错误(带有调试信息)发送到frpc。 默认情况下,此值为true。
detailed_errors_to_client = true

# AuthenticationMethod指定使用哪种身份验证方法对frps进行frpc身份验证。
# 如果指定了“令牌”-令牌将被读入登录消息。
# 如果指定了“ oidc”-将使用OIDC设置发行OIDC(开放ID连接)令牌。 默认情况下,此值为“令牌”。
authentication_method = token

# AuthenticateHeartBeats指定是否在发送给frps的心跳中包括身份验证令牌。 默认情况下,此值为false。
authenticate_heartbeats = false

# AuthenticateNewWorkConns指定是否在发送到frps的新工作连接中包括身份验证令牌。 默认情况下,此值为false。
authenticate_new_work_conns = false

#身份验证令牌
token = 12345678

# OidcClientId指定在AuthenticationMethod ==“oidc”时,用于在OIDC身份验证中获取令牌的客户端ID。
# 默认情况下,此值为“”。
oidc_client_id =

# OidcClientSecret指定如果AuthenticationMethod ==“oidc”,则用于在OIDC身份验证中获取令牌的客户端密码。
# 默认情况下,此值为“”。
oidc_client_secret = 

# OidcAudience如果AuthenticationMethod ==“ oidc”,则指定OIDC身份验证中令牌的受众。 默认情况下,此值为“”。
oidc_audience = 

# OidcTokenEndpointUrl指定实现OIDC令牌端点的URL。
# 如果AuthenticationMethod ==“oidc”,它将用于获取OIDC令牌。 默认情况下,此值为“”。
oidc_token_endpoint_url = 

#heartbeat configure,不建议修改默认值
#heartbeat_timeout的默认值为90
#heartbeat_timeout = 90

#仅允许frpc绑定您列出的端口,如果不进行任何设置,则没有任何限制
allow_ports = 2000-3000,3001,3003,4000-50000

#如果每个代理中的pool_count超过最大值,它将更改为max_pool_count
max_pool_count = 5

#最大端口可用于每个客户端,默认值为0表示无限制
max_ports_per_client = 0

#TlsOnly指定是否仅接受TLS加密的连接。 默认情况下,该值为false。
tls_only = false

#如果subdomain_host不为空,则可以在frpc的配置文件中将类型设置为http或https时设置子域
#当测试子域时,路由使用的主机是test.frps.com
subdomain_host = frps.com

#如果使用tcp流多路复用,则默认为true
tcp_mux = true

#HTTP请求的定制404页面
#custom_404_page = /path/to/404.html

[plugin.user-manager]
addr = 127.0.0.1:9000
path = /handler
ops = Login

[plugin.port-manager]
addr = 127.0.0.1:9001
path = /handler
ops = NewProxy

服务器所需环境

下载nginx-http-flv-module

nginx-http-flv-module的github地址:https://github.com/winshining/nginx-http-flv-module

git clone https://github.com/winshining/nginx-http-flv-module.git

安装nginx

nginx的官方网站:https://nginx.org/en/download.html
安装时候可能会报错没有安装openssl,需要执行命令:

##Ubuntu:
sudo apt-get install libpcre3 libpcre3-dev libpcrecpp0 libssl-dev zlib1g-dev
##Centos:
sudo yum -y install tar make openssl openssl-devel gcc pcre-devel pcre zlib zlib-devel gcc gcc-c++
wget http://nginx.org/download/nginx-1.17.5.tar.gz
tar -zxvf nginx-1.17.5.tar.gz
cd nginx-1.8.1
./configure --prefix=/usr/local/nginx  --add-module=../nginx-http-flv-module --with-http_ssl_module --with-cc-opt="-Wimplicit-fallthrough=0"
make && make install

创建软链接

ln -s /usr/local/nginx/sbin/nginx /usr/bin/nginx

创建系统服务

vim /etc/init.d/nginx

centos系统:

#!/bin/sh
#
# nginx - this script starts and stops the nginx daemon
#
# chkconfig:   - 85 15
# description:  NGINX is an HTTP(S) server, HTTP(S) reverse \
#               proxy and IMAP/POP3 proxy server
# processname: nginx
# config:      /usr/local/nginx/conf/nginx.conf
# config:      /etc/sysconfig/nginx
# pidfile:     /usr/local/nginx/logs/nginx.pid
# Source function library.
. /etc/rc.d/init.d/functions
# Source networking configuration.
. /etc/sysconfig/network
# Check that networking is up.
[ "$NETWORKING" = "no" ] && exit 0
nginx="/usr/local/nginx/sbin/nginx"
prog=$(basename $nginx)
NGINX_CONF_FILE="/usr/local/nginx/conf/nginx.conf"
[ -f /etc/sysconfig/nginx ] && . /etc/sysconfig/nginx
lockfile=/var/lock/subsys/nginx
make_dirs() {
   # make required directories
   user=`$nginx -V 2>&1 | grep "configure arguments:" | sed 's/[^*]*--user=\([^ ]*\).*/\1/g' -`
   if [ -z "`grep $user /etc/passwd`" ]; then
       useradd -M -s /bin/nologin $user
   fi
   options=`$nginx -V 2>&1 | grep 'configure arguments:'`
   for opt in $options; do
       if [ `echo $opt | grep '.*-temp-path'` ]; then
           value=`echo $opt | cut -d "=" -f 2`
           if [ ! -d "$value" ]; then
               # echo "creating" $value
               mkdir -p $value && chown -R $user $value
           fi
       fi
   done
}
start() {
    [ -x $nginx ] || exit 5
    [ -f $NGINX_CONF_FILE ] || exit 6
    make_dirs
    echo -n $"Starting $prog: "
    daemon $nginx -c $NGINX_CONF_FILE
    retval=$?
    echo
    [ $retval -eq 0 ] && touch $lockfile
    return $retval
}
stop() {
    echo -n $"Stopping $prog: "
    killproc $prog -QUIT
    retval=$?
    echo
    [ $retval -eq 0 ] && rm -f $lockfile
    return $retval
}
restart() {
    configtest || return $?
    stop
    sleep 1
    start
}
reload() {
    configtest || return $?
    echo -n $"Reloading $prog: "
    killproc $nginx -HUP
    RETVAL=$?
    echo
}
force_reload() {
    restart
}
configtest() {
  $nginx -t -c $NGINX_CONF_FILE
}
rh_status() {
    status $prog
}
rh_status_q() {
    rh_status >/dev/null 2>&1
}
case "$1" in
    start)
        rh_status_q && exit 0
        $1
        ;;
    stop)
        rh_status_q || exit 0
        $1
        ;;
    restart|configtest)
        $1
        ;;
    reload)
        rh_status_q || exit 7
        $1
        ;;
    force-reload)
        force_reload
        ;;
    status)
        rh_status
        ;;
    condrestart|try-restart)
        rh_status_q || exit 0
            ;;
    *)
        echo $"Usage: $0 {start|stop|status|restart|condrestart|try-restart|reload|force-reload|configtest}"
        exit 2
esac

ubuntu系统:

#! /bin/sh
# chkconfig: 2345 55 2
# Description: Startup script for nginx webserver on Debian. Place in /etc/init.d and
# run 'update-rc.d -f nginx defaults', or use the appropriate command on your
# distro. For CentOS/Redhat run: 'chkconfig --add nginx'

### BEGIN INIT INFO
# Provides:          nginx
# Required-Start:    $all
# Required-Stop:     $all
# Default-Start:     2 3 4 5
# Default-Stop:      0 1 6
# Short-Description: starts the nginx web server
# Description:       starts nginx using start-stop-daemon
### END INIT INFO

# Author:   licess
# website:  http://lnmp.org

PATH=/usr/local/sbin:/usr/local/bin:/sbin:/bin:/usr/sbin:/usr/bin
NAME=nginx
NGINX_BIN=/usr/local/nginx/sbin/$NAME
CONFIGFILE=/usr/local/nginx/conf/$NAME.conf
PIDFILE=/tmp/logs/nginx/$NAME.pid

case "$1" in
    start)
        echo -n "Starting $NAME... "

        if netstat -tnpl | grep -q nginx;then
            echo "$NAME (pid `pidof $NAME`) already running."
            exit 1
        fi

        $NGINX_BIN -c $CONFIGFILE

        if [ "$?" != 0 ] ; then
            echo " failed"
            exit 1
        else
            echo " done"
        fi
        ;;

    stop)
        echo -n "Stoping $NAME... "

        if ! netstat -tnpl | grep -q nginx; then
            echo "$NAME is not running."
            exit 1
        fi

        $NGINX_BIN -s stop

        if [ "$?" != 0 ] ; then
            echo " failed. Use force-quit"
            exit 1
        else
            echo " done"
        fi
        ;;

    status)
        if netstat -tnpl | grep -q nginx; then
            PID=`pidof nginx`
            echo "$NAME (pid $PID) is running..."
        else
            echo "$NAME is stopped"
            exit 0
        fi
        ;;

    force-quit)
        echo -n "Terminating $NAME... "

        if ! netstat -tnpl | grep -q nginx; then
            echo "$NAME is not running."
            exit 1
        fi

        kill `pidof $NAME`

        if [ "$?" != 0 ] ; then
            echo " failed"
            exit 1
        else
            echo " done"
        fi
        ;;

    restart)
        $0 stop
        sleep 1
        $0 start
        ;;

    reload)
        echo -n "Reload service $NAME... "

        if netstat -tnpl | grep -q nginx; then
            $NGINX_BIN -s reload
            echo " done"
        else
            echo "$NAME is not running, can't reload."
            exit 1
        fi
        ;;

    configtest)
        echo -n "Test $NAME configure files... "

        $NGINX_BIN -t
        ;;

    *)
        echo "Usage: $0 {start|stop|force-quit|restart|reload|status|configtest}"
        exit 1
        ;;

esac

赋予脚本可执行权限

chmod a+x /etc/init.d/nginx

将nginx服务加入chkconfig管理列表

chkconfig --add /etc/init.d/nginx
chkconfig nginx on
# 启动
systemctl start nginx

修改nginx配置文件

mkdir -p /usr/share/nginx/html/hls
vi /usr/local/nginx/conf/nginx.conf

加入以下内容rtmp模块:(rtmp{}的内容和http{}为同级,位置不要放错直接放到文件最后就行了)

rtmp {
    server {
        listen 1935;  #监听的端口可以自己改
        chunk_size 4000;
        application hls {  #rtmp推流请求路径
            live on;
            hls on;
            hls_path /usr/share/nginx/html/hls;
            hls_fragment 5s;
        }
    }
}

修改http中的server模块(重点就是修改端口和location ):

server {
    listen       80;  #端口可自定义
    server_name  localhost;
    #charset koi8-r;
    #access_log  logs/host.access.log  main;
    location / {
        add_header Cache-Control no-cache;
        add_header 'Access-Control-Allow-Origin' '*' always;
        add_header 'Access-Control-Expose-Headers' 'Content-Length,Content-Range';
        add_header 'Access-Control-Allow-Headers' 'Range';
        root   /usr/share/nginx/html;  #网站路径
        index  index.html index.htm;
    }
    #error_page  404              /404.html;
    # redirect server error pages to the static page /50x.html
    error_page   500 502 503 504  /50x.html;
    location = /50x.html {
        root   html;
    }

然后启动nginx:

# 启动
systemctl start nginx
# 查看状态
systemctl status nginx
# 停止
systemctl stop nginx

# 重载配置
nginx -s reload
# 测试配置是否正确
nginx -t

配置防火墙

firewall-cmd --zone=public --add-port=80/tcp --permanent
firewall-cmd --zone=public --add-port=1935/tcp --permanent
##重新载入
firewall-cmd --reload

开始推流

打开OBS,进入主界面
在文件->设置->串流 中填写信息:URL为 rtmp://xxx:1935/hls,xxx为你的服务器的IP地址(如我之前所说可以绑定域名),hls是用来存放流媒体的
秘钥可以随便填写一个,用来播放的时候识别播放哪个流媒体的,例如填写80ab164c-d9be-4867-8043-1e266e019dbb,随机生成ID网站
填写完毕后,回主界面,点击开始推流,就说明我们的流媒体服务器搭建成功了
打开/usr/share/nginx/html/hls,里面出现80ab164c-d9be-4867-8043-1e266e019dbb.m3u8说明推流正常了

观看直播(拉流)

这里推荐一个播放器,可以自动生成页面的————阿里云player播放器或者DPlayer

vi /usr/share/nginx/html/index.html

阿里云player播放器

<!DOCTYPE html>
<html>
<head>
<meta charset="utf-8">
<meta http-equiv="x-ua-compatible" content="IE=edge" >
<meta name="viewport" content="width=device-width, height=device-height, initial-scale=1, maximum-scale=1, minimum-scale=1, user-scalable=no"/>
<title>Tiger-live</title>
<link rel="stylesheet" href="https://g.alicdn.com/de/prismplayer/2.8.1/skins/default/aliplayer-min.css" />
<link rel="icon" type="image/x-icon" href="/favicon.ico" />
<link rel="shortcut icon" href="/favicon.ico" type="image/x-icon"/>
<script type="text/javascript" charset="utf-8" src="https://g.alicdn.com/de/prismplayer/2.8.1/aliplayer-min.js"></script>
<style>
    .citrons{
        position: absolute;
        width: 100%;
        height: 100%;
    }
    *{
        margin: 0;
        padding: 0;
        overflow:hidden;
    }
</style>
</head>
<body>
<div class="citrons">
<div class="prism-player" id="player-con"></div>
</div>
<script>
var player = new Aliplayer({
  "id": "player-con",
  "source": "http://IP地址或者域名/hls/80ab164c-d9be-4867-8043-1e266e019dbb.m3u8",
  "width": "100%",
  "height": "100%",
  "autoplay": true,
  "isLive": true,
  "rePlay": false,
  "playsinline": true,
/*  "cover":"http://IP地址或者域名/ow.jpg", */
  "preload": true,
  "controlBarVisibility": "hover",
  "useH5Prism": true,
  "skinLayout":[
   {name: "bigPlayButton", align: "blabs", x: 30, y: 80},
    {
      name: "H5Loading", align: "cc"
    },
    {name: "errorDisplay", align: "tlabs", x: 0, y: 0},
    {name: "infoDisplay"},
    {name:"tooltip", align:"blabs",x: 0, y: 56},
    {name: "thumbnail"},
    {
      name: "controlBar", align: "blabs", x: 0, y: 0,
      children: [
        {name: "progress", align: "blabs", x: 0, y: 44},
        {name: "playButton", align: "tl", x: 15, y: 12},
        {name: "fullScreenButton", align: "tr", x: 10, y: 12},
        /*{name:"setting", align:"tr",x:15, y:12},*/
        {name: "volume", align: "tr", x: 5, y: 10}
      ]
    }
  ]
}, function (player) {
    player._switchLevel = 0;
    player.on('liveStreamStop',function(e) {
        alert('还没开播呢');
    });
  }
);
</script>
</body>
</html>

Dplayer 播放器

<!DOCTYPE html>
<html>
<head>
<meta charset="utf-8">
<meta http-equiv="x-ua-compatible" content="IE=edge" >
<meta name="viewport" content="width=device-width, height=device-height, initial-scale=1, maximum-scale=1, minimum-scale=1, user-scalable=no"/>
<title>Tiger-live</title>
<link rel="stylesheet" href="https://cdn.jsdelivr.net/npm/dplayer@1.25.0/dist/DPlayer.min.css">
<script src="https://cdn.jsdelivr.net/npm/dplayer@1.25.0/dist/DPlayer.min.js"></script>
<script src="https://cdn.jsdelivr.net/npm/hls.js@latest"></script>
<style>
    #dplayer{
        width: 100%;
        height: 100%;
        position: fixed;
    }
    *{
        margin: 0;
        padding: 0;
    }
</style>
</head>
<body>
<div id="dplayer"></div>
<script>
const dp = new DPlayer({
    container: document.getElementById('dplayer'),
    live: true,
    autoplay: true,
    danmaku: false,
    video: {
        url: 'http://IP地址或者域名/hls/80ab164c-d9be-4867-8043-1e266e019dbb.m3u8',
        type: 'hls',
    },
});
</script>
</body>
</html>

目前,Docker 共有 13 个管理命令和 41 个通用命令,以下是常用 Docker 命令列表:

  • docker help—检查最新 Docker 可用命令;
  • docker attach—将本地输入、输出、错误流附加到正在运行的容器;
  • docker commit—从当前更改的容器状态创建新镜像;
  • docker exec—在活动或正在运行的容器中运行命令;
  • docker history—显示镜像历史记录;
  • docker info—显示系统范围信息;
  • docker inspect—查找有关 docker 容器和镜像的系统级信息;
  • docker login—登录到本地注册表或 Docker Hub;
  • docker pull—从本地注册表或 Docker Hub 中提取镜像或存储库;
  • docker ps—列出容器的各种属性;
  • docker restart—停止并启动容器;
  • docker rm—移除容器;
  • docker rmi—删除镜像;
  • docker run—在隔离容器中运行命令;
  • docker search—在 Docker Hub 中搜索镜像;
  • docker start—启动已停止的容器;
  • docker stop—停止运行容器;
  • docker version—提供 docker 版本信息。

查找 Docker 版本和系统信息

无论是在本地还是云端,我们都需要检查 Docker 版本和系统信息,可以使用以下命令找到 Docker 版本:

$ docker version

另一个重要命令是 docker info:

$ docker info

该命令将显示部分设备信息,比如服务器版本、存储驱动程序、内核版本、操作系统、总内存等。当尝试为当前 Docker 安装启动新资源或尝试找出系统级资源分配问题时,这些信息非常有用,这也是检查运行、停止容器数量及下载镜像数量的快速方法。

搜索下载 Docker 镜像

可以使用 docker search 命令在 Docker Hub 搜索已有镜像:

$ docker search ubuntu

以上对 ubuntu 的搜索显示可用镜像、描述和官方状态等信息。如果要下载 ubuntu 镜像,可以使用 docker pull 命令:

$ docker pull ubuntu
Using default tag: latest
latest: Pulling from library/ubuntu

详细列出拥有镜像

$ docker images
REPOSITORY TAG IMAGE ID CREATED SIZE
ubuntu latest 113a43faa138 2 weeks ago 81.2MB

假设下载 NGINX 镜像,可以运行 docker pull 命令:
$ docker pull nginx
如果检查 Docker 镜像,会看到如下内容:

$ docker images
REPOSITORY TAG IMAGE ID CREATED SIZE
ubuntu latest 113a43faa138 2 weeks ago 81.2MB
nginx latest cd5239a0906a 2 weeks ago 109MB

如果寻找 Ubuntu 16.04 版本,可使用 16.04 标签下载特定版本:
$ docker pull ubuntu:16.04
随后,将出现两个 Ubuntu 映像版本:

$ docker images
REPOSITORY TAG IMAGE ID CREATED SIZE
ubuntu 16.04 5e8b97a2a082 2 weeks ago 114MB
ubuntu latest 113a43faa138 2 weeks ago 81.2MB
nginx latest cd5239a0906a 2 weeks ago 109MB

注意:无需注册 Docker Hub 即可提取镜像。如果想将镜像推送到 Docker Hub,需要注册然后使用 docker login 命令登录:
$ docker login --username=yourhubusername --email=youremail@company.com
运行镜像的 Docker 容器
假设想在 docker 上运行 NGINX 服务器,可运行以下命令:
$ docker run -p 8080:80 nginx
如果已用 run 命令从 Docker Hub 提取 nginx 映像创建 NGINX 容器。 -p 8080:80 会告诉 Docker 将 localhost 端口 8080 映射到 Docker 容器端口 80,应该能够从 http:// localhost:8080 访问 NGINX 服务器。
NGINX 容器已附加到命令行。如果退出命令行,容器将会停止,可使用 detach(’- d)启动 NGINX 容器,这样即使退出命令行也可继续运行。
$ docker run -p 8080:80 -d nginx
以上命令将以分离模式启动容器并返回命令行。

列出 Docker 容器

docker ps 命令允许查找正在运行的所有容器:

$ docker ps
CONTAINER ID IMAGE COMMAND CREATED STATUS PORTS NAMES
6162daed25da nginx "nginx -g 'daemon of…" 7 minutes ago Up 7 minutes 0.0.0.0:8080-&gt;80/tcp hardcore_torvalds

如上显示容器的各种属性,可以看到是从 nginx 镜像创建并显示端口转发信息。CONTAINER ID 和 NAMES 属性需要特别提及,可以使用上述两大属性唯一标识容器。二者都可自动生成,但也可在容器创建过程中为容器命名。
创建一个名为 my_nginx 的 NGINX 容器:
$ docker run --name my_nginx -p 8888:80 -d nginx
再次列出所有 Docker 容器:

$ docker ps
CONTAINER ID IMAGE COMMAND CREATED STATUS PORTS NAMES
e7b19b6ad778 nginx "nginx -g 'daemon of…" About a minute ago Up About a minute 0.0.0.0:8888-&gt;80/tcp my_nginx
6162daed25da nginx "nginx -g 'daemon of…" 15 minutes ago Up 16 minutes 0.0.0.0:8080-&gt;80/tcp hardcore_torvalds

请注意,新容器的名称为“my_nginx”。 处理大量容器时,可以使用命名约定,这可以更好得组织容器。
docker ps 命令仅显示正在运行的容器。
如果对上述情况使用 docker info 命令:

$ docker info
Containers: 2
Running: 2
Paused: 0
Stopped: 0
Images: 3

可以看到有两个容器正在运行,如果一个暂停或已停止,则不会仅使用 docker ps 命令查看这些容器,必须使用 all( - a)选项:
$ docker ps -a

启动,停止,重启和杀死容器

假设要停止’my_nginx’容器,可使用 CONTAINER ID 或 NAME。

$ docker stop my_nginx
my_nginx

列出 Docker 容器:

$ docker ps
CONTAINER ID IMAGE COMMAND CREATED STATUS PORTS NAMES
6162daed25da nginx "nginx -g 'daemon of…" 27 minutes ago Up 27 minutes 0.0.0.0:8080-&gt;80/tcp hardcore_torvalds
$ docker ps -a
CONTAINER ID IMAGE COMMAND CREATED STATUS PORTS NAMES
e7b19b6ad778 nginx "nginx -g 'daemon of…" 12 minutes ago Exited (0) About a minute ago my_nginx
6162daed25da nginx "nginx -g 'daemon of…" 27 minutes ago Up 27 minutes 0.0.0.0:8080-&gt;80/tcp hardcore_torvalds

如果在没有 -a 选项的情况下运行 docker ps,只显示正在运行的容器。在第二种情况下,可以看到’my_nginx’容器处于退出状态。
让我们 docker start 容器:

$ docker start my_nginx
my_nginx

检查 Docker 容器列表:

$ docker ps
CONTAINER ID IMAGE COMMAND CREATED STATUS PORTS NAMES
e7b19b6ad778 nginx "nginx -g 'daemon of…" 16 minutes ago Up 29 seconds 0.0.0.0:8888-&gt;80/tcp my_nginx
6162daed25da nginx "nginx -g 'daemon of…" 30 minutes ago Up 30 minutes 0.0.0.0:8080-&gt;80/tcp hardcore_torvalds

可以看到 STATUS 显示容器’my_nginx’再次被启动。
如果由于某些问题而需重启容器,则可使用 restart 命令,这比单独停止和启动容器速度更快:
$ docker restart my_nginx
可以像进程一样终止 docker 容器,比如终止 my_nginx 容器:
$ docker kill my_nginx
再次列出 Docker 容器:

$ docker ps -a
CONTAINER ID IMAGE COMMAND CREATED STATUS PORTS NAMES
e7b19b6ad778 nginx "nginx -g 'daemon of…" 22 minutes ago Exited (137) 7 seconds ago my_nginx
6162daed25da nginx "nginx -g 'daemon of…" 36 minutes ago Up 36 minutes 0.0.0.0:8080-&gt;80/tcp hardcore_torvalds

容器 my_nginx 未运行。此外,可在信息中看到一个正在运行的容器和一个已停止容器:

$ docker info
Containers: 2
Running: 1
Paused: 0
Stopped: 1
Images: 3
…

Docker Exec Bash 和 Docker SSH
如果需要与 shell 进行交互以创建服务或解决问题,可以使用 docker exec 命令创建交互式 shell。比如,用 bash shell 从 ubuntu 映像启动一个容器:

$ docker run --name my_ubuntu -it ubuntu:latest bash
root@a19c770b8621:/#
root @haracle#表示位于 Docker 容器的 bash shell 中,可以运行 shell 命令:
root@a19c770b8621:/# ls
bin boot dev etc home lib lib64 media mnt opt proc root run sbin srv sys tmp usr var
root@a19c770b8621:/# pwd
/

列出 Docker 容器:

$ docker ps
CONTAINER ID IMAGE COMMAND CREATED STATUS PORTS NAMES
a19c770b8621 ubuntu:latest "bash" About a minute ago Up About a minute my_ubuntu
6162daed25da nginx "nginx -g 'daemon of…" About an hour ago Up About an hour 0.0.0.0:8080-&gt;80/tcp hardcore_torvalds

如上,my_ubuntu 正在运行。假设想将 Docker ssh 放入’my_ubuntu’容器中,可以使用 docker exec bash:

$ docker exec -it my_ubuntu bash
root@a19c770b8621:/#

使用 docker exec 向容器发出命令

例如,可以直接用命令提示符在 my_ubuntu 容器上运行 ls 命令:

$ docker exec -it my_ubuntu ls
bin dev home lib64 mnt proc run srv tmp var
boot etc lib media opt root sbin sys usr

以分离模式启动容器并使用 docker attach
以上示例用附加模式启动 ubuntu 容器,我们也可在分离模式下启动:

$ docker run -it -d --name my_ubuntu_2 ubuntu:latest bash
75b28b7208359137b3e1dc2843387918e28b4c6c4860ef0cdeac79c205f5cbc4

验证容器是否正在运行:

$ docker ps
CONTAINER ID IMAGE COMMAND CREATED STATUS PORTS NAMES
75b28b720835 ubuntu:latest "bash" 3 minutes ago Up 3 minutes my_ubuntu_2
a19c770b8621 ubuntu:latest "bash" 15 minutes ago Up 15 minutes my_ubuntu
6162daed25da nginx "nginx -g 'daemon of…" 2 hours ago Up 2 hours 0.0.0.0:8080-&gt;80/tcp hardcore_torvalds

使用 docker attach 命令获取 docker exec bash-like 效果:

$ docker attach my_ubuntu_2
root@75b28b720835:/#

检查 Docker 镜像历史

Docker 社区镜像是分层创建的,可使用 Docker history 命令查看镜像创建方式。先看看有哪些镜像:

$ docker images
REPOSITORY TAG IMAGE ID CREATED SIZE
ubuntu 16.04 5e8b97a2a082 2 weeks ago 114MB
ubuntu latest 113a43faa138 2 weeks ago 81.2MB
nginx latest cd5239a0906a 2 weeks ago 109MB

查看 nginx 镜像历史:

$ docker history nginx
IMAGE CREATED CREATED BY SIZE COMMENT
cd5239a0906a 2 weeks ago /bin/sh -c #(nop) CMD ["nginx" "-g" "daemon… 0B 
&lt;missing&gt; 2 weeks ago /bin/sh -c #(nop) STOPSIGNAL [SIGTERM] 0B 
&lt;missing&gt; 2 weeks ago /bin/sh -c #(nop) EXPOSE 80/tcp 0B 
&lt;missing&gt; 2 weeks ago /bin/sh -c ln -sf /dev/stdout /var/log/nginx… 22B 
&lt;missing&gt; 2 weeks ago /bin/sh -c set -x &amp;&amp; apt-get update &amp;&amp; apt… 53.7MB 
&lt;missing&gt; 2 weeks ago /bin/sh -c #(nop) ENV NJS_VERSION=1.15.0.0.… 0B 
&lt;missing&gt; 2 weeks ago /bin/sh -c #(nop) ENV NGINX_VERSION=1.15.0-… 0B 
&lt;missing&gt; 7 weeks ago /bin/sh -c #(nop) LABEL maintainer=NGINX Do… 0B 
&lt;missing&gt; 8 weeks ago /bin/sh -c #(nop) CMD ["bash"] 0B 
&lt;missing&gt; 8 weeks ago /bin/sh -c #(nop) ADD file:ec5be7eec56a74975… 55.3MB

使用镜像历史命令查找最近更改,如果在新版本镜像中发现问题,则此命令可帮助找到原因,也可用以下命令:
$ docker image history nginx

Docker 检查容器

可以使用 docker inspect 命令查找有关系统的信息,运行 docker ps 命令列出 Docker 容器:

$ docker ps
CONTAINER ID IMAGE COMMAND CREATED STATUS PORTS NAMES
6162daed25da nginx "nginx -g 'daemon of…" 2 hours ago Up 2 hours 0.0.0.0:8080-&gt;80/tcp hardcore_torvalds

使用 CONTAINER ID 检查容器(也可使用容器名称):

$ docker inspect 6162daed25da
[
{
"Id": "6162daed25da50b98afca5f7ed8caca2289bf309b2547d87ae8674b899d604a4",
"Created": "2018-06-25T05:46:37.902211302Z",
"Path": "nginx",
"Args": [
…
…
…
"DriverOpts": null
}
}
}
}
]

该命令将以 JSON 格式提供大量信息,以下是查找容器 IP 地址的技巧:

$ docker inspect 6162daed25da | grep "IPAddress"
 "SecondaryIPAddresses": null,
 "IPAddress": "172.17.0.2",
 "IPAddress": "172.17.0.2",

使用 docker cp 将文件从本地复制到容器
再次列出 Docker 容器:

$ docker ps
CONTAINER ID IMAGE COMMAND CREATED STATUS PORTS NAMES
6162daed25da nginx "nginx -g 'daemon of…" 3 hours ago Up 3 hours 0.0.0.0:8080-&gt;80/tcp hardcore_torvalds

NGINX 容器在端口 8080 上运行。因此,如果转到 http:// localhost:8080,将看到以下内容:
"Welcome to nginx!"
如果看到此页面,则 nginx Web 服务器已成功安装并正常运行,需要进一步配置。
首先,在本地目录中创建 index.html:
<html>
<Header><title>My Website</title></header>
<body>
Hello world
</body>
</html>
使用带有 ls 的 docker exec 命令检查 NGINX 容器中具有 index.html 的文件夹:

$ docker exec -it hardcore_torvalds ls /usr/share/nginx/html
50x.html index.html

使用创建的本地文件覆盖容器 index.html 文件:

$ docker cp index.html hardcore_torvalds:usr/share/nginx/html/ 

如果再次检查http://localhost:8080,应该可以看到问候语“Hello world”。
可使用 docker cp 命令在本地计算机和创建容器间移动文件,此方法可用于覆盖配置文件。

创建 Docker 镜像

如果想复制更多“Hello World”容器,必须将当前容器保存为镜像。
首先,停止容器:

$ docker stop hardcore_torvalds

列出所有 Docker 容器:

$ docker ps -a
CONTAINER ID IMAGE COMMAND CREATED STATUS PORTS NAMES
75b28b720835 ubuntu:latest "bash" About an hour ago Exited (0) About an hour ago my_ubuntu_2
a19c770b8621 ubuntu:latest "bash" 2 hours ago Exited (0) About an hour ago my_ubuntu
6162daed25da nginx "nginx -g 'daemon of…" 3 hours ago Exited (0) 27 seconds ago hardcore_torvalds

从 STATUS 中,可以看到 NGINX’corecore_torvalds’容器已停止。使用 docker commit 命令创建新镜像:

$ docker commit 6162daed25da nginx_hello_world_template
sha256:117d060587a316035ed5a776e613d9cfbeee9fbfe202c6edc9203820c7da987b

如果现在检查,将看到新镜像:

$ docker images
REPOSITORY TAG IMAGE ID CREATED SIZE
nginx_hello_world_template latest 117d060587a3 40 seconds ago 109MB
ubuntu 16.04 5e8b97a2a082 2 weeks ago 114MB
ubuntu latest 113a43faa138 2 weeks ago 81.2MB
nginx latest cd5239a0906a 2 weeks ago 109MB

可以使用此镜像并启动新 Docker 容器,新创建容器将具有“Hello world”页面,而不是“Welcome NGINX”页面。示例如下:

$ docker run -it -d -p 8886:80 nginx_hello_world_template
4e042d76c39125471951626ba42cd609a65c73f041943298f74f4fc43dc5596a
$

删除 Docker 容器和镜像
Docker 容器和镜像会占用硬盘空间,因此最好定期清理。首先停止所有容器,然后列出所有容器,使用以下 Docker 命令执行操作:

$ docker ps -a
CONTAINER ID IMAGE COMMAND CREATED STATUS PORTS NAMES
4e042d76c391 nginx_hello_world_template "nginx -g 'daemon of…" 2 minutes ago Exited (0) 8 seconds ago boring_keldysh
75b28b720835 ubuntu:latest "bash" 2 hours ago Exited (0) About an hour ago my_ubuntu_2
a19c770b8621 ubuntu:latest "bash" 2 hours ago Exited (0) About an hour ago my_ubuntu
6162daed25da nginx "nginx -g 'daemon of…" 3 hours ago Exited (0) 11 minutes ago hardcore_torvalds

如上,有 4 个处于停止状态的容器,可使用 docker rm 命令删除容器:

$ docker rm 4e042d76c391 75b28b720835 a19c770b8621 6162daed25da
4e042d76c391
75b28b720835
a19c770b8621
6162daed25da

可使用 NAMES 代替 CONTAINER ID,容器列表现在应该是干净的:

$ docker ps -a
CONTAINER ID IMAGE COMMAND CREATED STATUS PORTS NAMES

列出 Docker 镜像:

$ docker images
REPOSITORY TAG IMAGE ID CREATED SIZE
nginx_hello_world_template latest 117d060587a3 11 minutes ago 109MB
ubuntu 16.04 5e8b97a2a082 2 weeks ago 114MB
ubuntu latest 113a43faa138 2 weeks ago 81.2MB
nginx latest cd5239a0906a 2 weeks ago 109MB

可使用 docker rmi 命令和 IMAGE ID 删除 docker 镜像:

$ docker rmi 117d060587a3 5e8b97a2a082 113a43faa138 cd5239a0906a

最后,Docker 镜像列表应该是干净的:

$ docker images
REPOSITORY TAG IMAGE ID CREATED SIZE